UART Bare-Metal Upgrade Reference Example*
1. Example Usage Instructions*
The chip supports upgrade on blank devices, meaning that even if no firmware has ever been burned into the chip, it can still be upgraded via UART. This upgrade process is safe and reliable. If a power failure or an exception occurs during the upgrade, causing the device to become bricked, you can still hold down the BOOT button and power-cycle the device to restart, then re-initiate the OTA upgrade. The upgrade process is completely independent of the internal firmware running on the chip.
Important
Only UART0 and UART1 are supported for upgrade. The hardware must be able to reset the chip (or power-cycle it) and control the BOOT pin (the BOOT pin must be pulled low during the upgrade process).
We provide C code examples that can run on Linux PC and Windows PC for customer reference and integration into their own solutions.
For the Windows environment, you need to install the gcc compiler mingw first and configure the environment variables. If not installed, run mingw-get-setup.exe from the mingw-get-setup.tar.gz archive inside fornax_uart_ota.zip to install it.
Reference code: http://yun.nationalchip.com:10000/l/4FluNL
Compile on Linux: make linux
Compile on Windows: mingw32-make
For specific usage instructions, refer to the Readme.md inside fornax_uart_ota.zip.
2. UART OTA Flowchart*
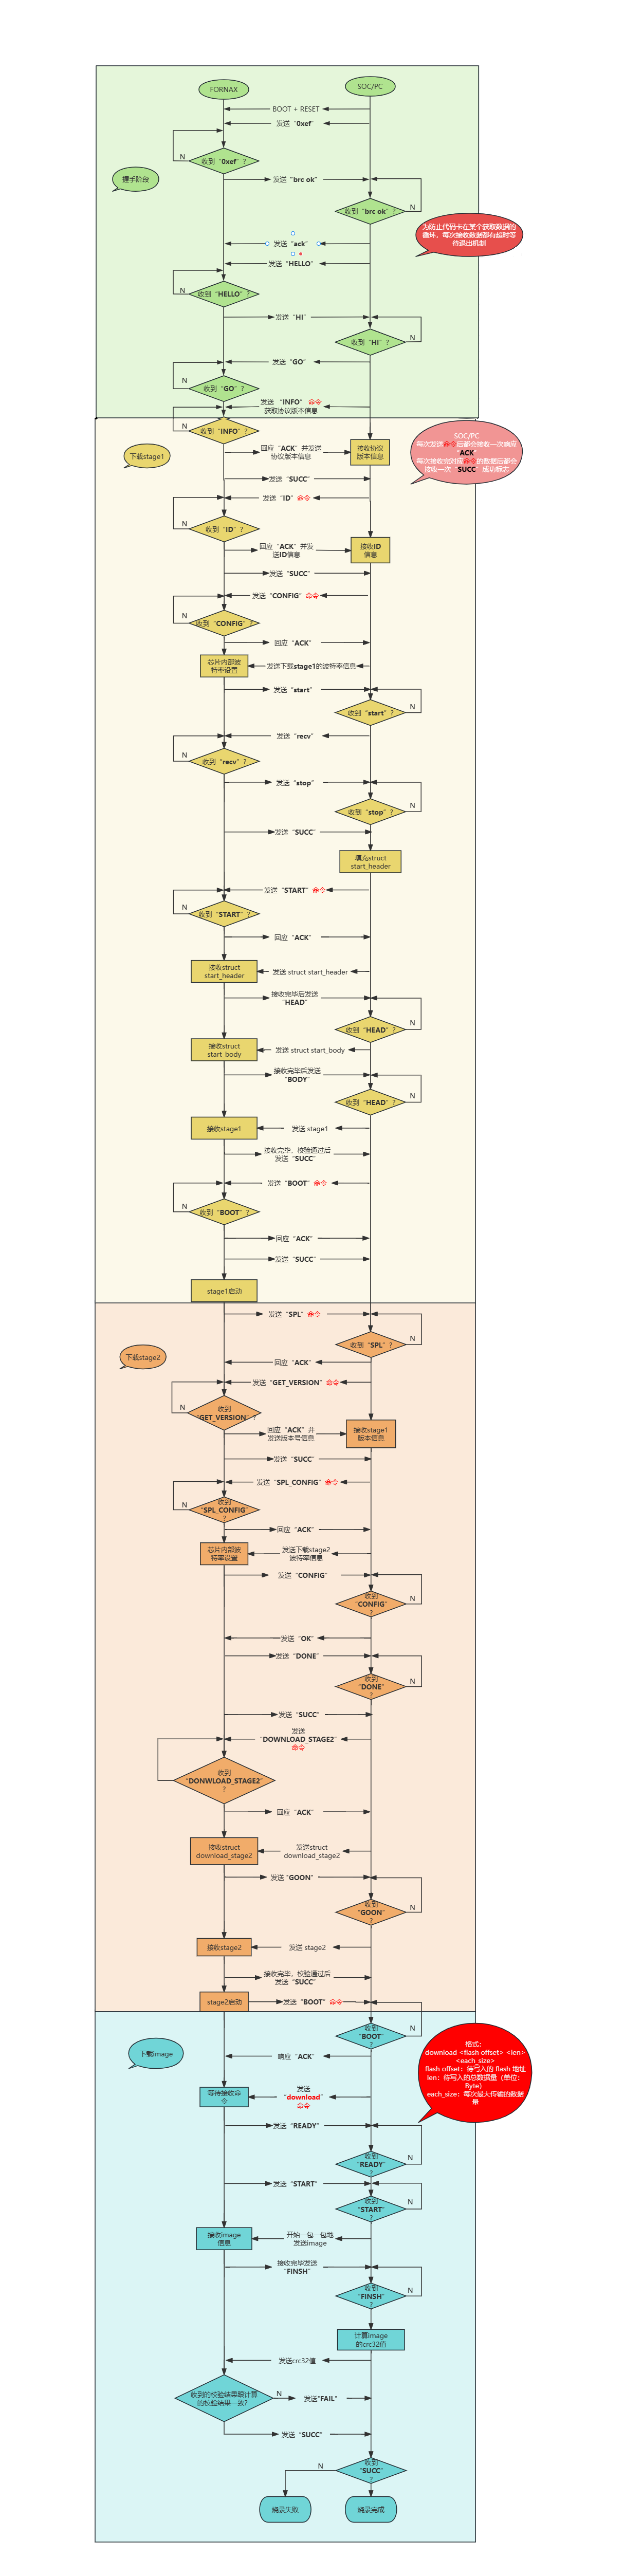
3. Porting Considerations*
-
The upgrade process is divided into two stages: first, the bootloader is loaded, and after the bootloader starts, the firmware to be burned is loaded. Therefore, developers need to embed fornax_nre.boot into their own upgrade code, or store it in the host MCU's flash. fornax_nre.boot is approximately 70K in size.
-
During the upgrade process, you can initially use the UART baud rate recommended in our code. If instability is observed, you can lower the baud rate and test again to find a suitable baud rate.
- Developers do not need to focus on the upgrade protocol flow; it can be ported directly. However, attention should be paid to porting.c, where the UART receive interface should be replaced with the one from your own platform.
- When power-cycling the FORNAX, pay attention to the power-on sequence: first hold down BOOT, then press RESET once to reset, or re-power the FORNAX.
- When porting, it is recommended to use the timeout values provided in our reference example. The example uses relatively long timeouts for better stability. Moreover, under normal OTA conditions, this time is very short. Even if an exception causes a failure, this timeout is still very short compared to the entire OTA process.
- When porting, it is strongly recommended to first debug using our development board with jumper wires. This helps eliminate potential PCBA hardware issues. After successful debugging on the development board, proceed to test on the PCBA. If you encounter issues during development board debugging, you can easily capture the development board logs and send them to us for analysis and troubleshooting.
- If the handshake phase fails, first ensure the power-on sequence is correct, then try setting a longer handshake timeout, such as a 5-second timeout.