UART Protocol Porting Guide*
Reminder
For the UART protocol, please refer to the GX8006 Large Model Development Kit (GX8006大模型开发包.md#3gx8006大模型开发包) and download the 国芯微离线语音协议_v*.pdf.
1. UART Protocol Parsing Flow*
-
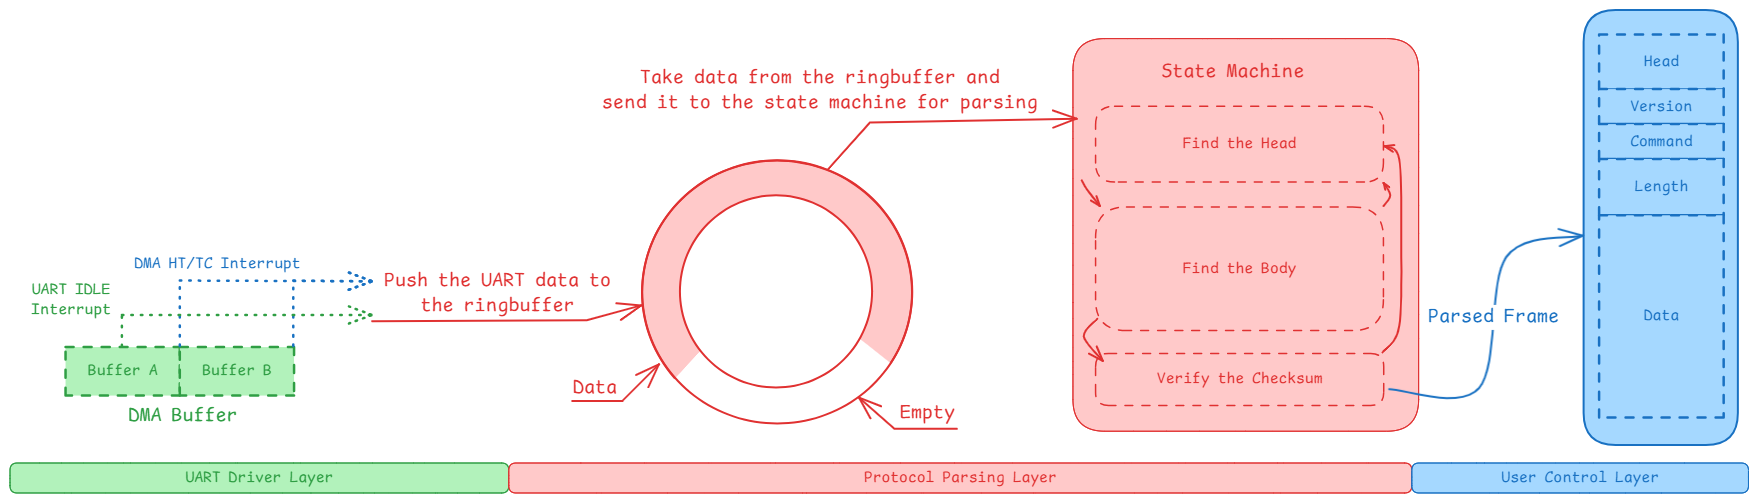
The UART driver layer needs to be ported and implemented by the user based on the development environment of the controlling MCU. It mainly completes the following functions:
- UART hardware initialization: Configure basic UART parameters, including baud rate, data bits, stop bits, parity bits, etc.
- Data transmission and reception management: Implement UART data transmission and reception functions to ensure reliable data transfer.
- DMA configuration: Configure DMA channels, transfer modes, buffers, and other parameters to optimize data transfer efficiency.
- Interrupt handling: Implement UART and DMA related interrupt handling to ensure timely data processing.
-
For the protocol parsing layer, you can refer to the
lightningproject in thegitlabrepository to develop the UART driver.- SDK link: http://gitlab.nationalchip.com/nationalchip/voice-wifi-solution/lightning Reference directories:
- Dependent memory pool code:
components/utils/mempool - Dependent ring buffer code:
components/utils/ringbuffer - Audio buffer:
project/ln_model_public/app/audio - UART protocol implementation:
project/ln_model_public/app/smartbot
- Dependent memory pool code:
- Main functions to be completed:
- Data frame parsing: Parse received data frames, extract command type, data length, data content, and other information.
- Response assembly: Assemble response data frames based on processing results or user-layer results.
- State management: Maintain the frame parsing state machine and handle abnormal situations.
- Data verification: Implement data frame verification to ensure data integrity.
- SDK link: http://gitlab.nationalchip.com/nationalchip/voice-wifi-solution/lightning Reference directories:
-
The user control layer processes the frame structure data submitted by the parsing layer.
1.1. Communication Architecture*
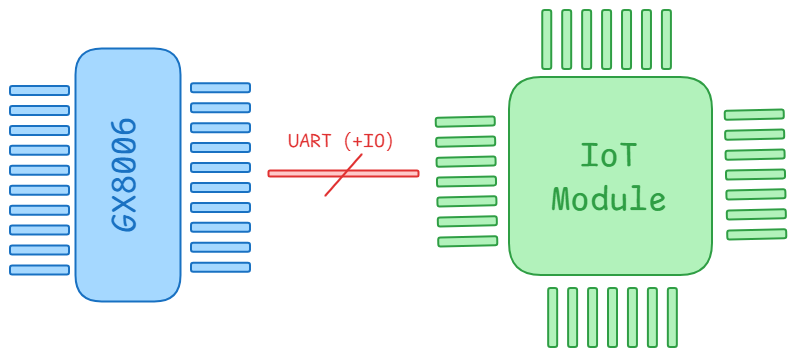
- The two parties in UART communication are:
- Voice chip (GX8006): Acts as the protocol server.
- User control MCU: Acts as the protocol client.
1.2. DMA Transfer Recommendations*
- Since the communication data contains relatively large audio data, it is strongly recommended to use DMA for UART data transfer for the following reasons:
- Reduced CPU load: DMA can transfer data directly between memory and peripherals without CPU intervention.
- Improved transfer efficiency: DMA transfer is faster and is not delayed by the CPU processing other tasks.
- Prevents data loss: DMA can continuously receive data without data loss caused by untimely CPU processing.
1.3. Variable-Length Data Handling*
Since UART data packet lengths are variable, it is recommended to handle them using the following approach:
-
Frame structure design
- Frame header: Used to identify the start of a data packet.
- Length field: Indicates the length of the subsequent data.
- Data payload: The actual data being transmitted.
- Checksum field: Used to verify data integrity.
-
Data reception flow
- Use DMA to receive data into a buffer.
- Parse the data frame using a state machine.
- Identify the start of the data packet based on the frame header.
- Determine the end position of the data packet based on the length field.
- Perform data verification to ensure integrity.
-
Buffer management
- A ring buffer is recommended.
- Set an appropriate buffer size, preferably at least twice the size of the maximum data packet.
- Implement handling mechanisms for buffer full/empty states.
2. UART Interaction Flow*

-
UART communication adopts a request-response interaction method. The specific flow is as follows:
- After sending a data frame, you must wait for the voice chip's reply before sending a new data frame.
- While waiting for the reply, you may receive data frames actively reported by the voice chip, including:
- Audio data frames: Need to be processed promptly and reported to the cloud.
- Wake-up event frames: Need to be processed promptly and an acknowledgment frame sent.
- Other event frames: Handle according to the specific event type.
-
Frame processing mechanism:
- Determine the type of the current frame based on the sub-command field in the frame structure.
- If it is a reply to a previously sent frame, then:
- Process the reply content.
- Unblock the sending process, allowing new data frames to be sent.
- If it is an actively reported data frame, then:
- Process the frame data immediately.
- Send the corresponding acknowledgment frame based on the frame type.
- Continue waiting for the reply to the previously sent frame.
-
Notes:
- A transmission queue needs to be maintained to ensure data frames are sent in order.
- A timeout handling mechanism must be implemented to avoid waiting indefinitely.
- Concurrency must be handled correctly to ensure real-time data processing.
- It is recommended to use a state machine to manage the entire interaction flow.
- The voice chip side uses a foreground/background system, managing received data with DMA + Ringbuffer.
- Sending new data without waiting for a reply will cause the voice chip's received data to be overwritten.
3. Microphone Gain Configuration Example:*
Microphone gain configuration is an important parameter for voice interaction and directly affects the performance of voice recognition. Pay attention to the following points during configuration:
-
Configuration parameter description:
- Sample rate (sample_rate): Only 16000Hz is supported, suitable for voice encoding and fully covers the human voice frequency range.
- Sample bit depth (bit): Only 16bit is supported, the standard bit depth for voice and music encoding.
- Number of channels (channels): Only mono is supported, suitable for voice communication scenarios.
- Gain value (dB): Range 0-32dB, 26dB is recommended.
- Data format (format): Only OPUS format is supported.
- Maximum receive length (max_recv_len): Set according to the actual application scenario, it is recommended to be no less than 1024 bytes; the voice chip will continuously send multiple 80-byte voice frames until the module's maximum receivable data length is reached.
-
Configuration flow:
- Send the configuration command frame.
- Wait for the voice chip to return an acknowledgment frame.
- Verify the returned command number and return value. If the configuration is not supported, the voice chip will return an error.
- Release the response frame memory.
static int smartbot_set_mic(void)
{
    int status = 0;
    /* Buffer for GX8006 response frame */
    sbot_frame_t *rsp = NULL;
    /* Sub-command frame structure for configuring microphone function */
    struct smartbot_mic_config
    {
        uint8_t     cmd;            /* Sub-command number: SBOT_CMD_SET_MIC_CONFIG */
        uint32_t    sample_rate;    /* Sample rate (transmitted in big-endian format) */
        uint8_t     bit;            /* Sample bit depth */
        uint8_t     channels;       /* Number of audio channels */
        uint8_t     dB;             /* Microphone gain, range 0-32dB */
        uint8_t     format;         /* Transmission data format */
        uint32_t    max_recv_len;   /* Maximum data receivable at once, in bytes */
    }
    __PACKED__ req_data =
    {
        .cmd            = SBOT_CMD_SET_MIC_CONFIG,
        .sample_rate    = smartbot_le2be_u32(16000),
        .bit            = 16,
        .channels       = 1,
        .dB             = 26,
        .format         = 2,
        .max_recv_len   = smartbot_le2be_u32(1024),
    };

    /* This call blocks the current thread until the response frame from GX8006 is received, and returns the address of the response frame to rsp */
    rsp = smartbot_talk((uint8_t *)&req_data, sizeof(req_data));
    if (NULL == rsp)
    {
        return -1;
    }

    /* Response frame structure, parse the data part of rsp */
    struct smartbot_mic_config_resp
    {
        uint8_t cmd;
        uint8_t retcode;
    }
    __PACKED__ *rsp_data = (struct smartbot_mic_config_resp *)(rsp->data);

    /* Verify it is the correct response and the return value is correct */
    status = ((rsp_data->cmd == req_data.cmd) && (rsp_data->retcode == 0x00)) ? 0 : -1;
    LOG(LOG_LVL_INFO, "[SBOT] subcmd: %02X retcode: %d\r\n", rsp_data->cmd, rsp_data->retcode);

    /* The response frame data returned by the lower layer is dynamically allocated and needs to be freed */
    OS_Free(rsp);

    return status;
}
4. Interaction Mode Configuration Description:*
4.1 Function Control Description*
-
The voice reporting function is controlled by three levels:
- Mic master switch (0x01): Controls the microphone switch.
- 0: Turn off MIC
- 1: Turn on MIC
- Wake-up function (0x03): Controls wake-up detection.
- 0: Turn off wake-up function
- 1: Turn on wake-up function
- Vad function (0x04): Controls voice activity detection.
- 0: Turn off Vad
- 1: Turn on Vad, timeout = 1000ms
- Greater than 1: Turn on Vad, timeout = configured value * 40ms
- Mic master switch (0x01): Controls the microphone switch.
-
Control priority (from high to low):
- Mic switch > Wake-up flag > Vad flag
-
Timeout configuration:
- Vad timeout configuration command (0x07): Controls the sensitivity of Vad detection.
- Wake-up timeout configuration command (0x05): Controls the duration of the wake-up state.
4.2 Typical Application Scenarios*
4.2.1 Wake-up Continuous Conversation Mode*
- Function description: After wake-up, audio is reported directly, continuously for 60 seconds.
- Configuration steps:
- Set maximum pickup time: 60 seconds
- Set wake-up timeout: 60 seconds
- Turn on the Mic master switch
- Turn off the Vad function
- Turn on the wake-up function
- Notes: The wake-up time should be less than the pickup time, otherwise the maximum pickup time cannot be reached.
- Configuration commands:
55aa0092000307083cdf  # Maximum pickup time 60s
55aa0092000307073cde  # Wake-up timeout 60s
55aa009200030701019d  # Turn on Mic master switch
55aa009200030704009f  # Turn off Vad function
55aa009200030703019f  # Turn on wake-up function
4.2.2 Button Long-Press Conversation Mode*
- Function description: Data is reported while the button is long-pressed, with a maximum duration of 60 seconds.
- Configuration steps:
- Set maximum pickup time: 60 seconds
- Turn off all functions by default
- Turn on mic when the button is pressed
- Turn off mic when the button is released
- Configuration commands:
55aa0092000307083cdf  # Set maximum pickup time 60 seconds
55aa009200030701009c  # Turn off mic
55aa009200030703009e  # Turn off wake-up
55aa009200030704009f  # Turn off vad
55aa009200030701019d  # Turn on mic when button is long-pressed
55aa009200030701009c  # Turn off mic when button is released
4.2.3 Button-Triggered Conversation Mode*
- Function description: After button trigger, data is reported when Vad activates. Vad ends after 1 second of no speech, and wake-up exits after 5 seconds of no speech.
- Configuration steps:
- Set wake-up timeout: 5 seconds
- Turn on vad and set vad interval: 1 second
- Turn off mic and wake-up function
- Configure button trigger and timeout handling
- Configuration commands:
55aa00920003070705a7  # Set wake-up timeout 5s
55aa009200030701009c  # Turn off mic
55aa00920003070419b8  # Turn on vad and set vad interval 1s
55aa009200030703009e  # Turn off wake-up
55aa009200030701019d  # Turn on mic when button is triggered
55aa009200030701009c  # Turn off mic when voice reporting ends, i.e., upon receiving vad report end
4.2.4 Wake-up Triggered Conversation Mode*
- Function description: Wake-up is required for each conversation. Data is reported when Vad activates. Vad ends after 1 second of no speech, and wake-up exits after 5 seconds of no speech.
- Configuration steps:
- Set wake-up timeout: 5 seconds
- Turn on vad and set vad interval: 1 second
- Turn on all functions
- Configure timeout handling
- Configuration commands:
55aa00920003070705a7  # Set wake-up timeout 5s
55aa00920003070419b8  # Turn on vad and set vad interval 1s
55aa009200030703019f  # Turn on wake-up
55aa00920003070601a2  # Set timeout notification
55aa009200030701019d  # Turn on mic
55aa00920003070601a2  # Set timeout notification when voice reporting ends, i.e., upon receiving vad report end
4.2.5 Free Conversation Mode*
- Function description: Wake-up is required initially, then controlled by Vad. Vad ends after 1 second of no speech, and wake-up exits after 30 seconds of no speech.
- Configuration steps:
- Set wake-up timeout: 30 seconds
- Turn on vad and set vad interval: 1 second
- Turn on all functions
- Configuration commands:
55aa0092000307071ec0  # Set wake-up timeout 30s
55aa00920003070419b8  # Turn on vad and set vad interval 1s
55aa009200030703019f  # Turn on wake-up
55aa00920003070601a2  # Set timeout notification
55aa009200030701019d  # Turn on mic
4.2.6 Wake-up Q&A Mode*
- Function description: Wake-up is required initially. During playback, only the wake-up word can interrupt. When not playing, data is reported when Vad activates. Wake-up exits after 30 seconds of no speech.
- Configuration steps:
- Set wake-up timeout: 30 seconds
- Turn on vad and set vad interval: 1 second
- Turn on all functions
- Configure playback start and end handling
- Configure wake-up event handling
- Configuration commands:
55aa0092000307071ec0  # Set wake-up timeout 30s
55aa00920003070419b8  # Turn on vad and set vad interval 1s
55aa009200030703019f  # Turn on wake-up
55aa00920003070601a2  # Set timeout notification
55aa009200030701019d  # Turn on mic
55aa00920003070601a2  # Set timeout notification when voice reporting ends, i.e., upon receiving vad report end
55aa009200030701009c  # Turn off mic when playback starts
55aa009200030701019d  # Turn on mic when playback ends
55aa00920003070501a1  # Actively notify wake-up after playback ends
55aa009200030701019d  # Actively turn on mic after wake-up word interruption
4.3 Vad Sensitivity Control*
- Function description: Adjusts the sensitivity of Vad detection. The default sensitivity value may vary with firmware versions.
- Determining the default value: Check the
.configfile in the firmware package and search forCONFIG_NON_AEC_VAD_THRESHOLD(sensitivity for non-playback state) andCONFIG_AEC_VAD_THRESHOLD(sensitivity for playback state). - Parameter range:
- 0-100: The larger the value, the lower the sensitivity.
- Configuration commands:
55aa0092000307092dd1 # Set vad threshold to 45
4.4 Noise Reduction Settings*
- Function description: Adjusts the noise reduction level. Default level is 0.
- Parameter range:
- 0x00-0x03: Represents the noise reduction level.
- 0xFF: Disables noise reduction.
- Configuration commands:
55aa00920003070A01a6 # Set noise reduction level 1
4.4 Reference Examples*
Reminder
The code in the documentation may not be updated promptly. It is recommended to check the code repository for the latest code.
- In the
lightningproject in thegitlabrepository, underproject/ln_model_public/app/smartbot/smartbot_modes.c, the switching between the following 5 modes is implemented:- Free conversation mode
- Wake-up conversation mode
- Button conversation mode
- Long-press conversation mode
- Q&A mode
- Each mode is abstracted as the following structure:
struct smartbot_mode { /* config */ bool qa_conv_deactivated; /* Used to flag whether timeout exit is set during Q&A mode when CONFIG_MIC_STOP_SET_DEACTIVATE is enabled */ bool longpress_conv_pressed; /* Used to suppress the stop recording event caused by the extra button release when double-clicking to switch modes in long-press conversation mode */ sbot_audio_res_id_t res; /* Local mode playback resource */ /* function */ void (*on_ui_event)(sbot_mode_t *, sbot_event_t); /* Event callback registered to the user interface, used to handle user actions in different modes, such as single click, long press, etc. */ void (*on_selected)(sbot_mode_t *); /* Callback triggered when the current mode is selected */ void (*on_conv_start)(sbot_mode_t *); /* Callback triggered when SBOT_EVENT_EXTERNAL_WAKEUP event occurs */ void (*on_conv_stop)(sbot_mode_t *); /* Callback triggered when SBOT_EVENT_EXTERNAL_SHUTDOWN event occurs */ void (*on_mic_start)(sbot_mode_t *); /* Callback triggered when microphone reporting starts */ void (*on_mic_stop)(sbot_mode_t *); /* Callback triggered when microphone reporting stops */ void (*on_spk_start)(sbot_mode_t *); /* Callback triggered when speaker playback starts */ void (*on_spk_stop)(sbot_mode_t *); /* Callback triggered when speaker playback stops */ void (*on_spk_abort)(sbot_mode_t *); /* Callback triggered when speaker playback is interrupted */ void (*on_set_idle)(sbot_mode_t *); /* Callback triggered when it needs to enter idle state (prevent data reporting) */ void (*on_timeout)(sbot_mode_t *, int); /* Callback triggered when a timeout exit is required */ }; - When any mode is selected, the following configuration is performed:
- Configure the default microphone switch, wake-up, and VAD settings for the current mode.
- Register the current mode's event handler with the button processing module.
- Persist the current mode.
static void on_mode_conv_selected(sbot_mode_t *mode_inst)
{
    smartbot_set_offline_config(SBOT_OFFLINE_SUBCMD_MIC, mode_inst->mic);
    smartbot_set_offline_config(SBOT_OFFLINE_SUBCMD_WAKEUP, mode_inst->awk);
    smartbot_set_offline_config(SBOT_OFFLINE_SUBCMD_VAD, mode_inst->vad);

    ui_button_awk_register_callback(mode_inst->on_ui_event);
    sysparam_store(SBOT_MODE_KEY, (const void *)&_this_mode_index, sizeof(_this_mode_index));
}
- Example of long-press conversation mode:
/* User interface event handling */
static void on_longpress_conv_ui_event(sbot_mode_t *mode_inst, sbot_event_t event)
{
    switch (event)
    {
        case SBOT_EVENT_BTN_DOUBLE_CLICK:   /* Double-click reports mode switch event */
        {
            SBOT_MODE_EVT_CALL(SBOT_EVENT_SWITCH_MODE);
            OS_TimerStop(&g_timer_modes_tmo);
            break;
        }

        case SBOT_EVENT_BTN_LONGPRESS:      /* Long-press reports conversation start event */
        {
            mode_inst->longpress_conv_pressed = true;
            if (!on_sbot_mode_event_cb) return;
            int res_id = AUDIO_RES_WAKEUP;
            short data_len = sizeof(int);
            uint8_t *tmp = (uint8_t *)OS_Malloc(data_len);
            int ret;
            if (NULL == tmp) {
                LOG(LOG_LVL_ERROR, "[[SBOT]] SBOT_EVENT_BTN_DOUBLE_CLICK malloc failed\r\n");
                break;
            }
            memcpy(tmp, &res_id, data_len);
            ret = on_sbot_mode_event_cb(SBOT_EVENT_EXTERNAL_WAKEUP, tmp, data_len);
            if (ret) OS_Free(tmp);
            break;
        }

        case SBOT_EVENT_BTN_RELEASE:        /* Release triggers conversation end event */
        {
            if (mode_inst->longpress_conv_pressed)
            {
                mode_inst->longpress_conv_pressed = false;
                SBOT_MODE_EVT_CALL(SBOT_EVENT_EXTERNAL_SHUTDOWN);
                OS_TimerStart(&g_timer_modes_tmo);
            }
            break;
        }

        default:
            break;
    }
}

/* Triggered when double-clicking to switch to long-press conversation mode, performs some configuration on the 8006 */
static void on_longpress_conv_selected(sbot_mode_t *mode_inst)
{
    (void)mode_inst;
    sbot_set_mic_pickup_period(60);
    sbot_set_mic_onoff(0);
    sbot_set_awk_onoff(0);
    sbot_set_vad_onoff_or_threshold(0);
}

/* Triggered when long-pressing in long-press conversation mode */
static void on_longpress_conv_start(sbot_mode_t *mode_inst)
{
    (void)mode_inst;
    sbot_set_mic_onoff(1);
}

/* Triggered when the long press is released in long-press conversation mode */
static void on_longpress_conv_stop(sbot_mode_t *mode_inst)
{
    (void)mode_inst;
    sbot_set_mic_onoff(0);
}

/* Triggered when the 8006 needs to be idle (prevent data reporting) in long-press conversation mode */
static void on_longpress_conv_set_idle(sbot_mode_t *mode_inst)
{
    LN_UNUSED(mode_inst);
    sbot_set_mic_onoff(false);
}

/* Triggered when playback starts */
static void on_longpress_conv_spk_start(sbot_mode_t *mode_inst)
{
    LN_UNUSED(mode_inst);
    OS_TimerStop(&g_timer_modes_tmo);
}

/* Triggered when playback stops */
static void on_longpress_conv_spk_stop(sbot_mode_t *mode_inst)
{
    LN_UNUSED(mode_inst);
    OS_TimerStart(&g_timer_modes_tmo);
}

static sbot_mode_t sbot_mode_longprss_conv =
{
    .res            = AUDIO_RES_MODE_LONGPRESS,
    .on_ui_event    = on_longpress_conv_ui_event,
    .on_selected    = on_longpress_conv_selected,
    .on_conv_start  = on_longpress_conv_start,
    .on_conv_stop   = on_longpress_conv_stop,
    .on_spk_start   = on_longpress_conv_spk_start,
    .on_spk_stop    = on_longpress_conv_spk_stop,
    .on_set_idle    = on_longpress_conv_set_idle,
};
5. FAQ*
5.1. The customer's module is responsible for playback. How to enable the AEC function of the voice chip?*
- Generally, the AEC (Acoustic Echo Cancellation) function requires both playback and recording to be on the voice chip side, as the chip can eliminate the sound from its own speaker through internal loopback.
- If the customer's module is responsible for audio playback, and only the voice chip is needed for wake-up and recording, but AEC is still required, then:
- Hardware: The customer's module must route the audio playback signal to the loopback channel of the voice chip.
- Software: The customer's module must use the [Command: Notify MCU Module Playback Status (0xF6)] to inform the voice chip of the current playback status at the start and end of playback.
5.2. Are there format restrictions on audio sent from the cloud?*
- There are format restrictions on the data played by the voice chip.
- The configuration command format for voice chip playback is defined as follows:
struct smartbot_spk_config { uint8_t cmd; /* Sub-command number: SBOT_CMD_SET_SPK_CONFIG */ uint32_t sample_rate; /* Sample rate (transmitted in big-endian format) */ uint8_t bit; /* Sample bit depth */ uint8_t volume; /* Volume, range 0-100, step 10. */ uint8_t format; /* Transmission data format */ uint32_t max_send_len; /* Maximum data receivable at once, in bytes */ } - Configuration parameter description:
- Sample rate (sample_rate): Only 16000Hz is supported, suitable for voice encoding and fully covers the human voice frequency range.
- Sample bit depth (bit): Only 16bit is supported, the standard bit depth for voice and music encoding.
- Volume (volume): Speaker volume value, range 0-100, step 10..
- Data format (format): Only PCM and OPUS formats are supported.
- Maximum send length (max_send_len): Set according to the actual application scenario; if the length exceeds the maximum length the voice chip can handle, an error and the acceptable length will be returned.
- Length is 255 Bytes for OPUS encoding.
- Length is 1152 Bytes for PCM.